Manipulating Perlin Noise for Organic Procedural Animations
Jun 2, 2024 | Thirafi Dide
My blog design is quite simple. The original intent is to make a simple website that highlight the contents, but has micro interactions and animations scattered across the website to make it feels more alive. I haven’t add much of interactions and animations, and I wanted to start adding it by redesigning the hero section in the homepage.

The Ideas
I don’t want to add anything big or flashy to it, just a simple animation that can grab people attention while keeping it small to not overshadow the contents. Right now it is a simple grid of dots with some gradients. I originally planned this to be intractable, though no exact design in mind. So like any other great artist, I looked into some websites to steal some ideas.
First thing that caught my attention is Josh W. Comeau personal website. It has grid of dots similar to me, but has simple “follow the cursor” interaction when you hover it.

Other thing that I also love is MKBHD website. It has grid of dots with some wavy looping animations. I like it a lot, but then I got disappointed to know that it is animated by looping a video in the background and not with code. Not that was a bad thing, just that it means that it can’t add any interaction to it.

So for now, maybe let’s try to combine it? Some wavy grid of dots that has small interaction when you hover into it.
Getting the texture
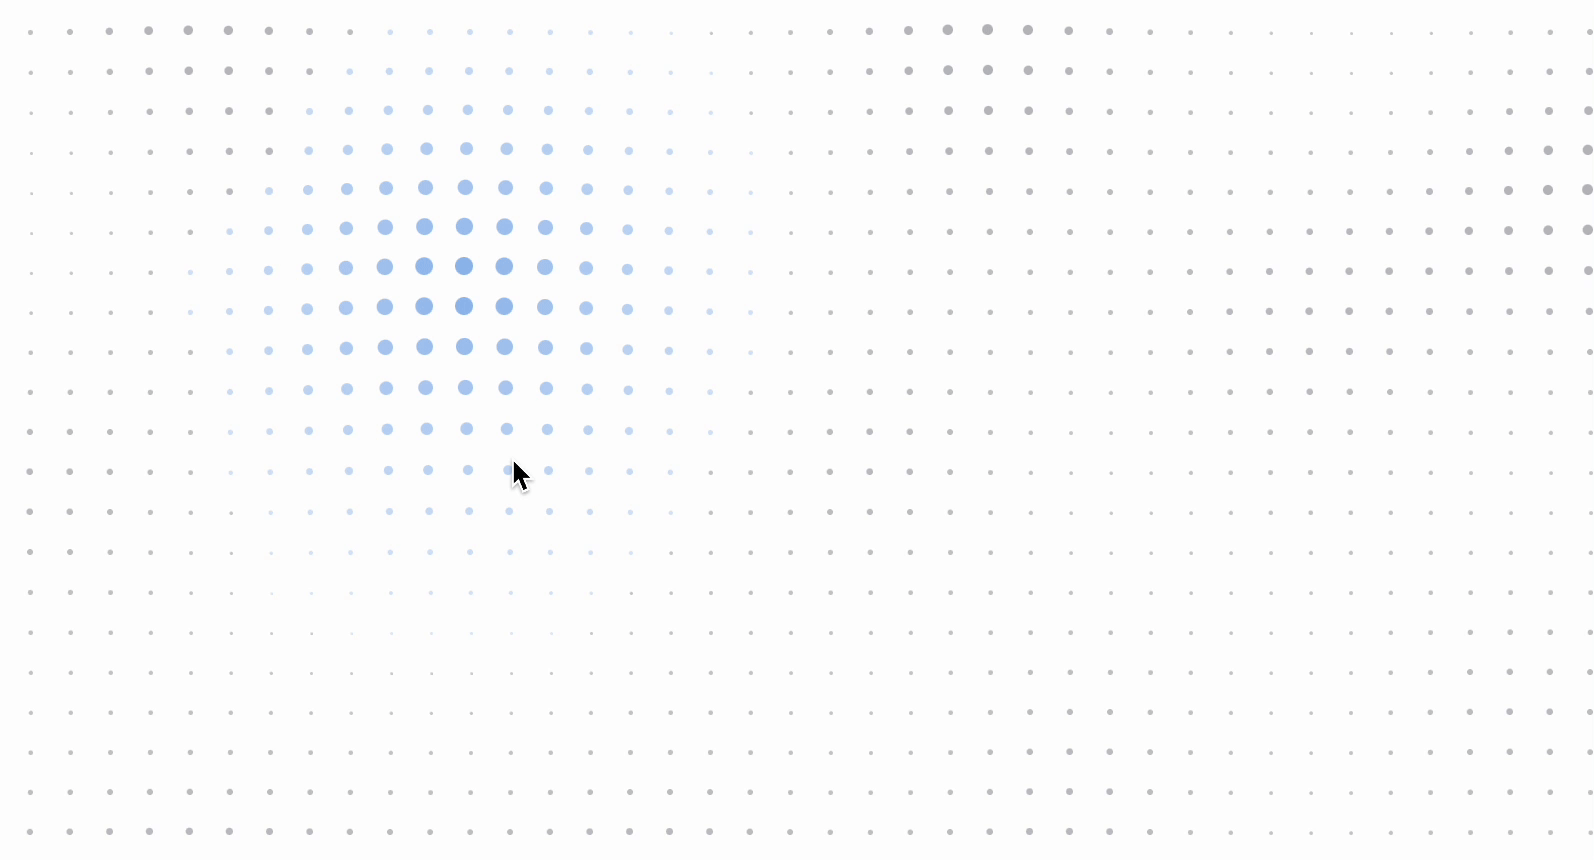
At first I have no idea where to start. But from what I learned when learning game development for hobby is, for every procedural generation, start with a perlin noise. In most basic form, perlin noise is a way to generate a random value given a coordinate. The coordinate can be in any dimension, and the results usually comes in range of either 0 to 1 or -1 to 1. Without going too deep into the implementation details, Perlin Noise pseudo-randomness allow us to generate natural-looking texture like this one:
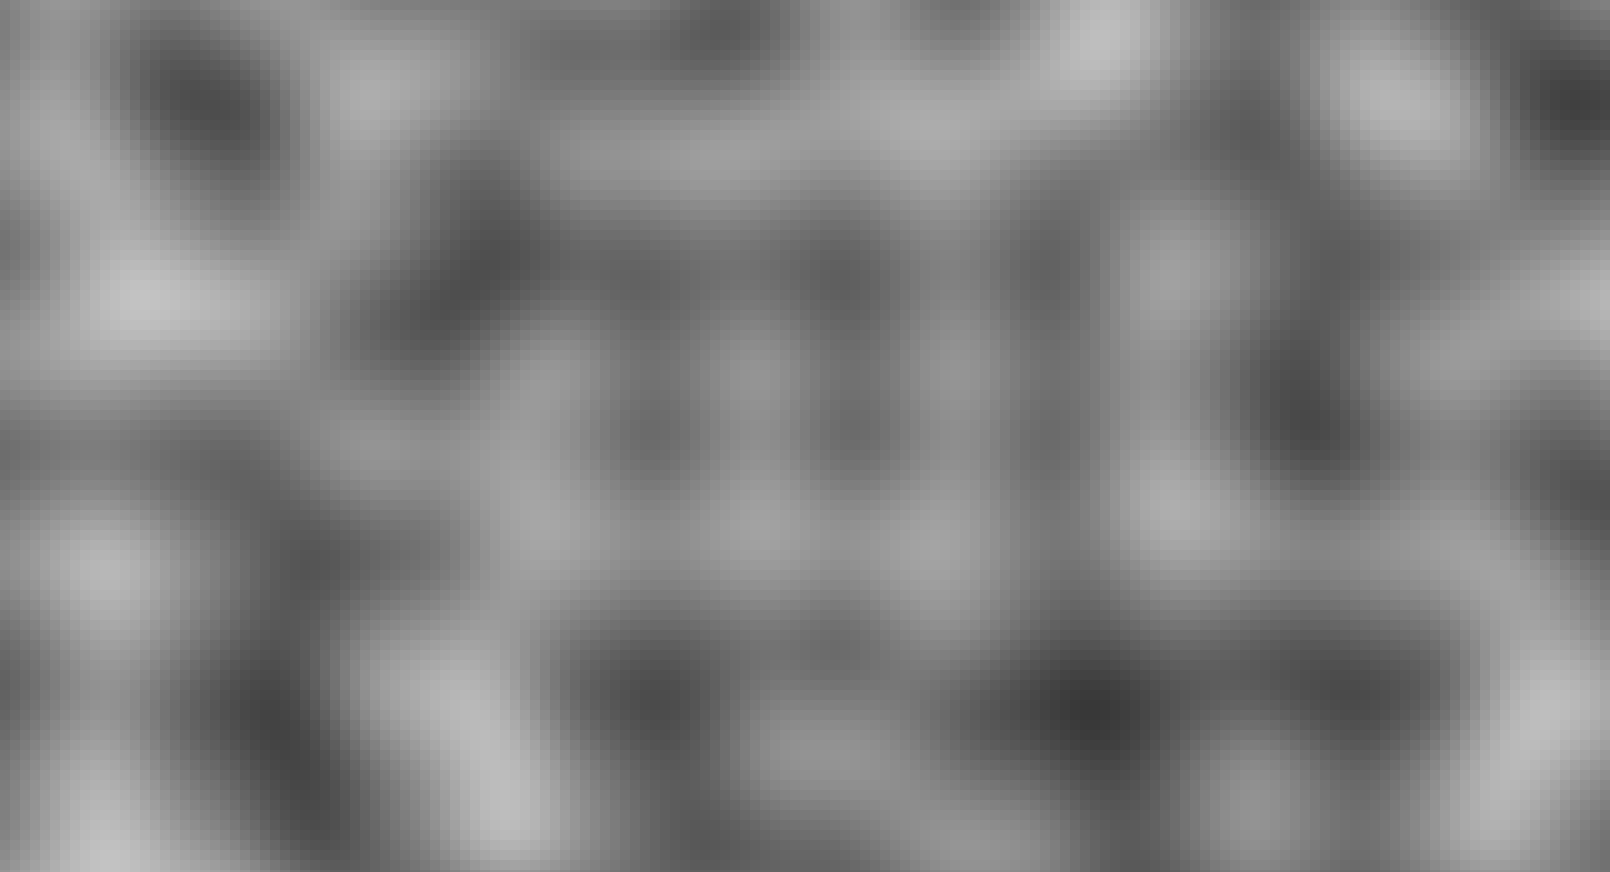
In image above, each value from perlin noise from each coordinate is represented by greyscale colour, with 1 is white and it gets darken as it closer to 0, which represented by pure black. I use HTML Canvas to render this.
for (let y = 0; y < height; y += cellSize) {
	for (let x = 0; x < width; x += cellSize) {
		const noise = getNoise({ x, y });
		const color = noise * 255;
		ctx.fillStyle = `rgb(${color} ${color} ${color})`;
		ctx.fillRect(x, y, cellSize, cellSize);
	}
}
Making it moves
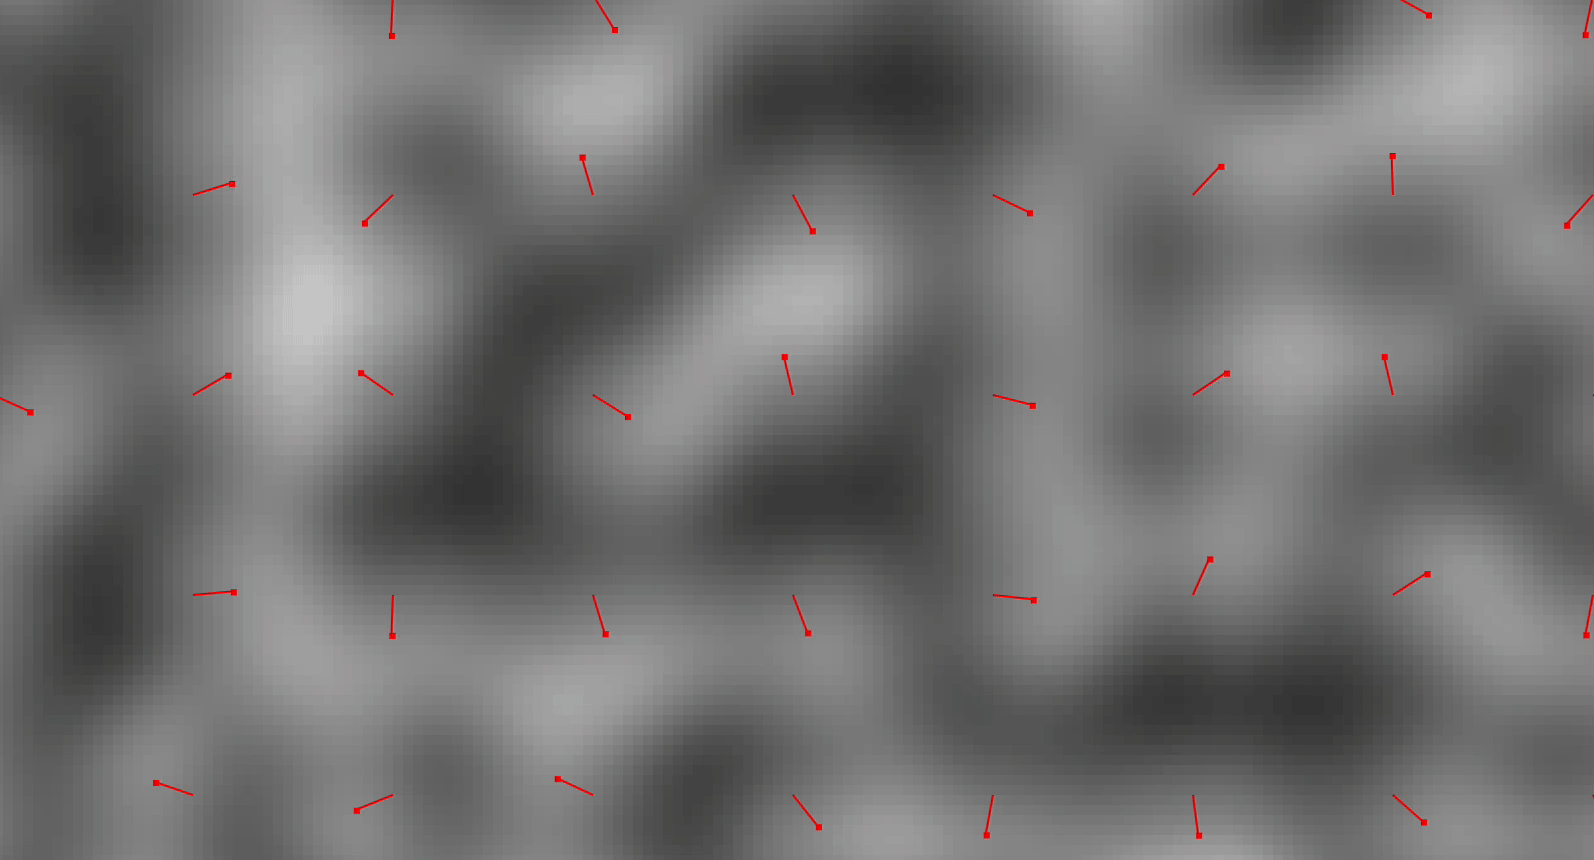
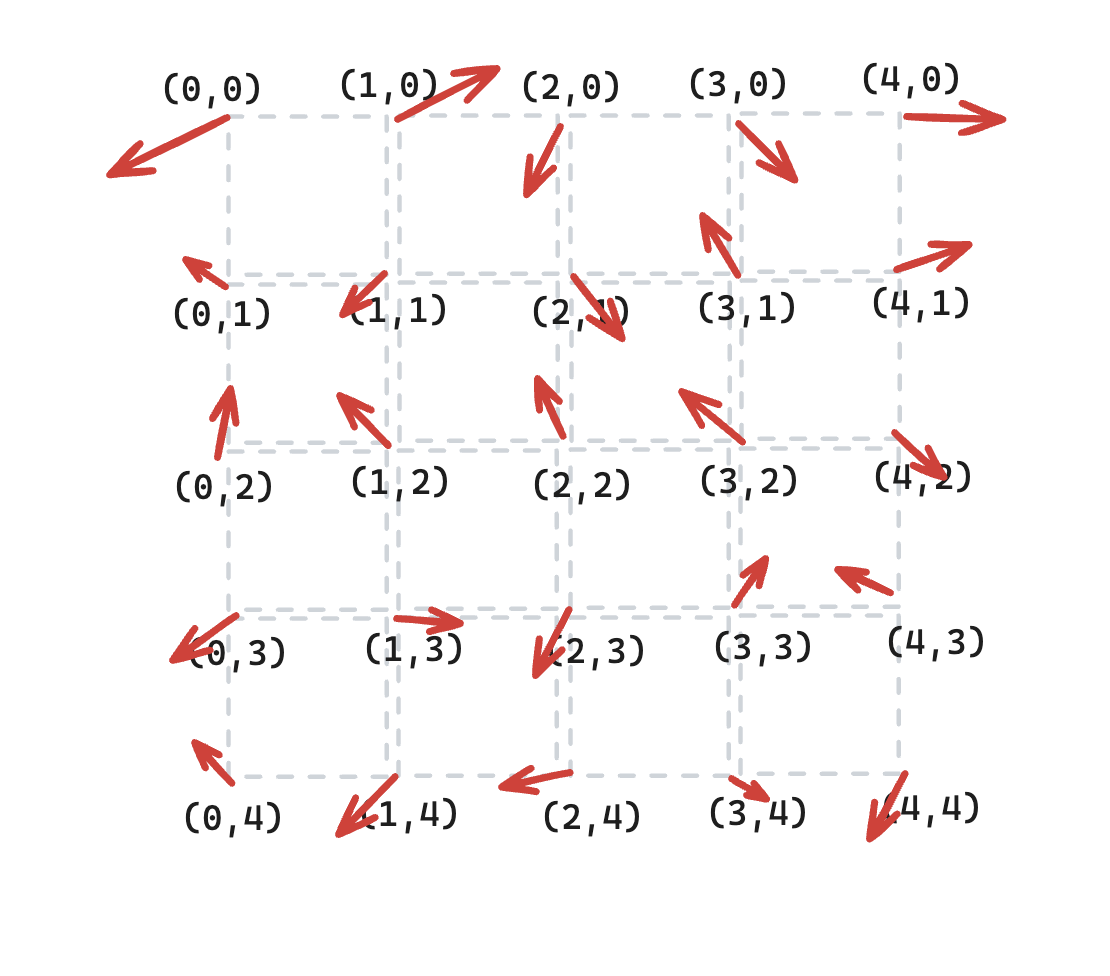
How do perlin noise generate this? So before generating any random value, perlin noise generate random gradient vectors in grid formations, then it interpolate those vectors to the distance of any coordinate to get the random value of those coordinates.
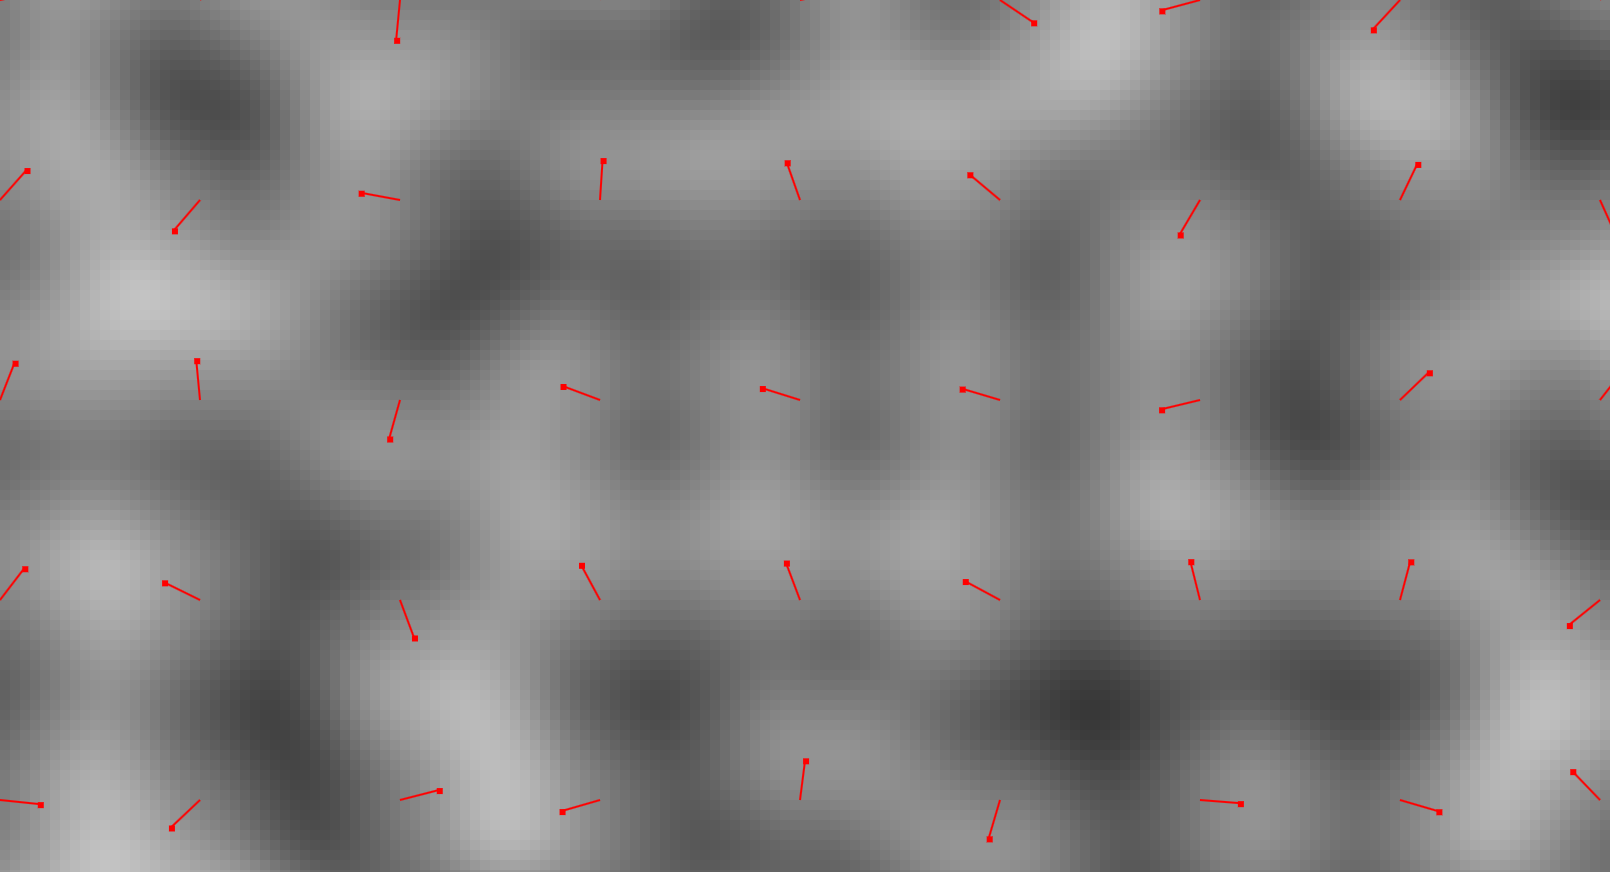
I will skipping the implementation details for now (It involve some vector maths. I will discuss the details in the bottom if you’re interested) but understanding those gradients exist would allow us to see that areas pointed by the gradient vectors would generate a higher value (white). So the idea is that we can manipulate the gradients to animate the texture! What I did is a simple random rotation to the gradient vectors, and that how I got the wavy animations.
Doing the animation with canvas itself is quite simple: We just redraw the canvas on every frame. In JavaScript we can use requestAnimationFrame recursively to run a callback for every repaint. For now I just lock it to 60fps, so running the update function on each 1/60s.
function animationLoop(callback: () => void) {
	let previousTimeStamp = 0;
	let requestAnimationFrameId: number;

	const frameStep = (timeStamp: number) => {
		if (previousTimeStamp === 0) {
			previousTimeStamp = timeStamp;
		}

		// 60 fps
		const timePerFrame = (1 / 60) * 1000;
		const delta = timeStamp - previousTimeStamp;
		if (delta >= timePerFrame) {
			previousTimeStamp = timeStamp;
			callback();
		}

		// recusrive loop
		requestAnimationFrameId = requestAnimationFrame(frameStep);
	};

	// start the loop
	requestAnimationFrameId = requestAnimationFrame(frameStep);

	// cleanup when the component get unmounted
	return () => cancelAnimationFrame(requestAnimationFrameId);
}

const cleanupAnimation = animationLoop(() => {
	// clear everything in the canvas
	ctx.clearRect(0, 0, width, height);

	// do the animation update and redraw
	randomRotateGradients(width, height, Math.PI / 100);
	drawDotsBoard(ctx, width, height);
});
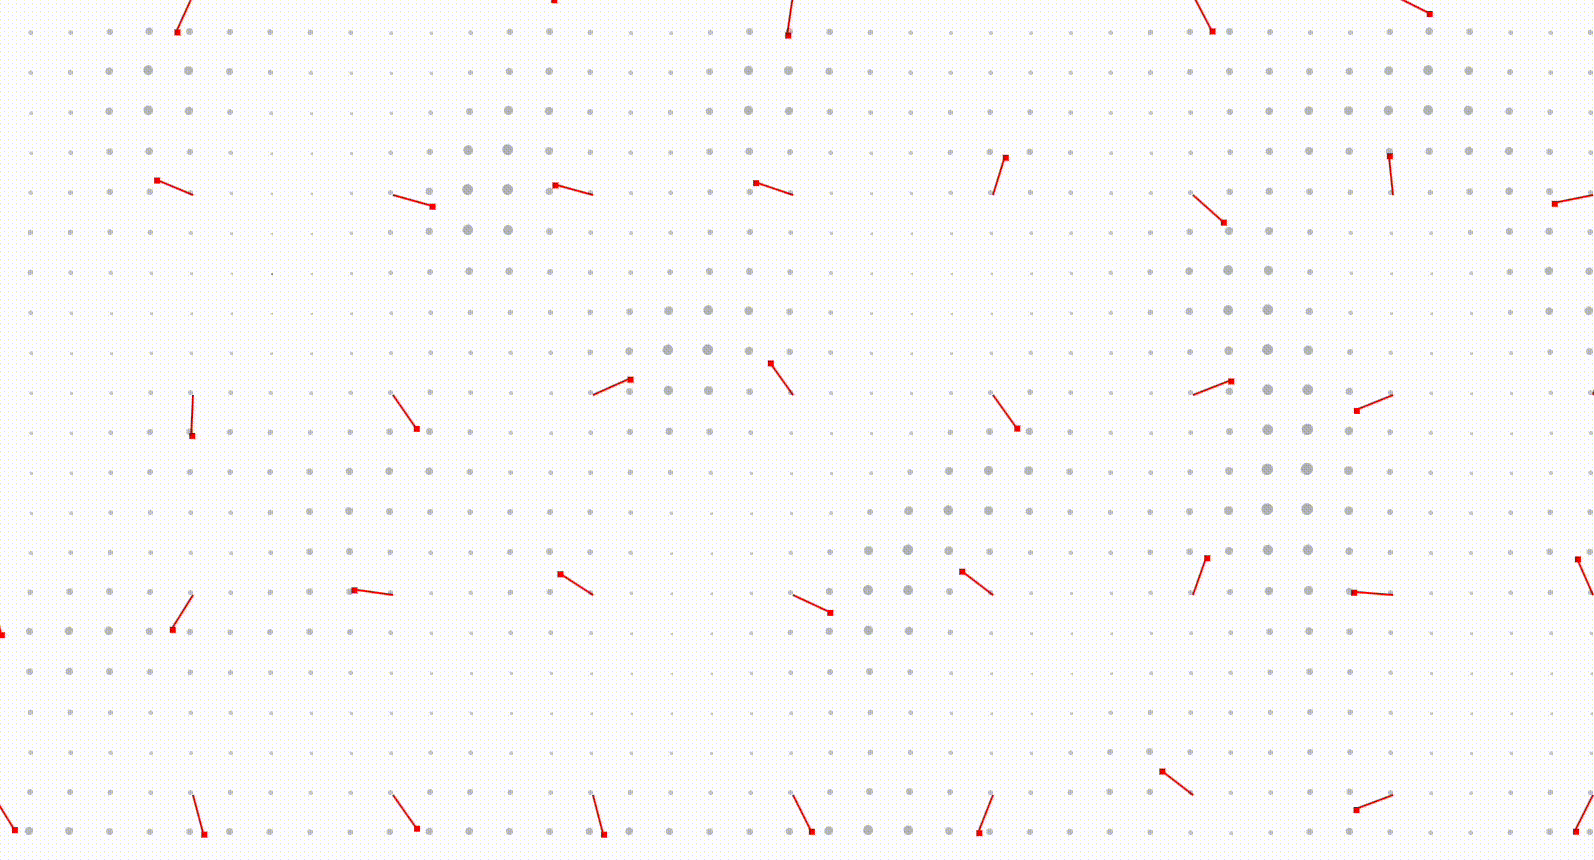
Now instead painting the canvas with white and black gradients, I just draw a grid of dots and vary the radius to scale with the generated perlin noise. Nice!
Small touch of interaction
Now using mouse move event we can also track the mouse movement to add some interaction. For now, I just keep it simple by making the dots bigger the closer it is to the cursor, and also highlight them with teal colours which is my main accent colour for my blog.
const mouseMoveCallback = (e: MouseEvent) => {
	const { x, y } = canvasElement.getBoundingClientRect();
	// cursor coordinate relative to the canvas position
	cursorX = e.clientX - x;
	cursorY = e.clientY - y;
};
window.addEventListener('mousemove', mouseMoveCallback);
It’s very helpful to get the colours from the CSS vars instead just copying it to the JS. This way I have a single source of truth for the colours, and I don’t need to add any additional logic for the dark mode theme as the CSS vars already adjusted when the theme changes. I also just found out that CSS can convert from one colour space to another using from , in this case I use it to convert hex to rgb.
const cssComputedStyle = getComputedStyle(canvasElement);
// returns #ffffff on light mode, #1f2232 on dark mode. Defined in my global CSS
const lightPrimaryHex = cssComputedStyle.getPropertyValue('--light-primary');
ctx.fillStyle = `rgb(from ${lightPrimaryHex} r g b / ${opacity}%)`;
ctx.fillRect(0, 0, width, height);
To make it looks more organic, I use ease in exponential interpolation for the size of the dots relative to the cursor position, and I remove the colours when the size of the dots from it’s proximity to the cursor is smaller than the size it gets from the perlin noise. This make the blue dots formation appear more as an organic blob instead of a simple circle. And after a lot of number adjustments, I got the desired effects.
And there we have it! Simple animation to spice up my homepage for a bit. It was fun re-learning some vector math to implement the perlin noise by myself (which I need because I need to manipulate the gradient vectors for the animation) and then get a working generative design. I quite like the result, and this opens up more opportunities to create more interesting design. There are a lot of other possibilities to fancy up the perlin noise, like adjusting the octaves, falloff, and even stacking multiple perlin noise to get more interesting textures and animations, and I will sure explore it in the future.
For now, here is the full code for you to explore!
The Math of Perlin Noise
For you nerds like me who interested with the math, I will explain a bit deeper of the details of how perlin noise works. To make it simple, I will explain the algorithm for 2 dimensional perlin noise. The original Perlin noise actually written in 3D, which you can actually get the source code here.
Interpolation
Interpolation is a function that takes a value and returns a new value. Ok that was very helpful. I don’t really know how to formally describe it, but you probably already use it a lot. For example, what is 40% of 1200? That is the same as interpolation of value 0.4 to the range of 0 to 1200. Interpolation allow us to get the value from a range with a certain percentage. One use case of this is for animation: Given that we want to animate stretching width of something from 100px to 345px in 3 second, we can get the width on t second by getting the interpolation of t/3 to the range of 100 to 345.
// Linear interpolation of a value to the range of min-max.
// Value should be a number from 0 to 1
export function interpolate(min: number, max: number, val: number): number {
	return (max - min) * val + min;
}
You most likely familiar with linear interpolation above, which map the value to the range linearly. But as frontend developer, you most likely familiar with non-linear interpolation as well. One example is easing function on CSS transition, which you want to start the animation slower but get faster over time (for ease-in function).
// easing animation maybe
The gradients and the noises
Essentially, perlin noise start with a grid of random vectors. These should be a normal vector (vector with a length of 1). These vectors are called gradient vectors, which will be used to generate the surrounding perlin noise. Let’s make a gradient vectors on each round numbers coordinate.
// This is just a wrapper class for a Map<number, Map<number, Vector>>
const gradients = new Map2D<number, Vector>();

// We don't need to generate the gradients ahead of time,
// This will generate a gradient vector when needed and
// store it for persistance
function getGradient({ x, y }: Coordinate) {
	let gradient = gradients.get(x, y);
	if (!gradient) {
		gradient = getRandomUnitVector();
		gradients.set(x, y, gradient);
	}

	return gradient;
}
To get a perlin noise value for a given coordinate, we need to interpolate the values from the surrounding gradient vectors. So for example, for coordinate (3.47, 2.21) we need to get the gradient vectors of (3, 2), (4, 2), (3, 3), (4, 3). As you can see from the illustration below, it is the corner of the grid where the coordinate is located.
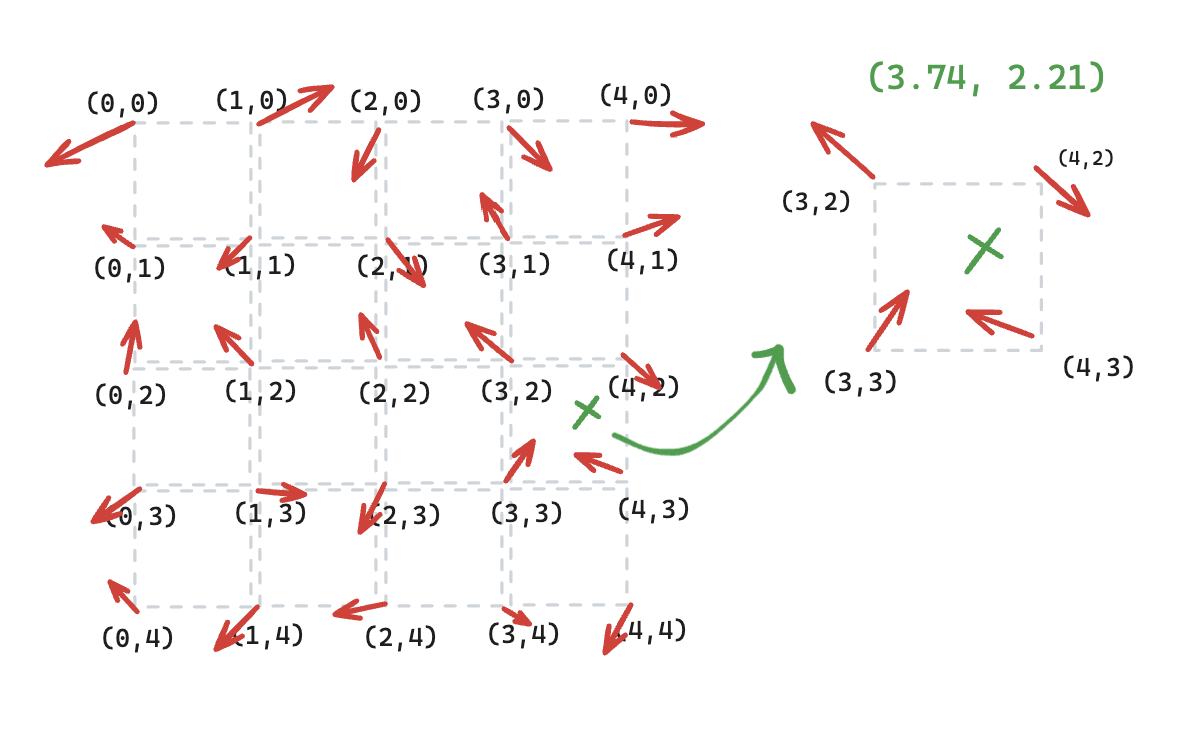
function getNoise(coord: Coordinate) {
	const { x, y } = coord;

	const topLeftGradX = Math.floor(x);
	const topLeftGradY = Math.floor(y);

	const topLeftGradientCoord = { x: topLeftGradX, y: topLeftGradY };
	const topRightGradientCoord = { x: topLeftGradX + 1, y: topLeftGradY };
	const bottomLeftGradientCoord = { x: topLeftGradX, y: topLeftGradY + 1 };
	const bottomRightGradientCoord = { x: topLeftGradX + 1, y: topLeftGradY + 1 };

	// ...
}
So how to interpolate a coordinate to 4 surrounding vectors? We can do this by calculating the dot product of each gradient vectors with the distance vectors to the given coordinate. Then we get to interpolate the result relative to the position of the coordinate to the grid. Usually it use non-linear interpolation to smoothen up the transition and hiding it’s hidden gradients grid pattern.
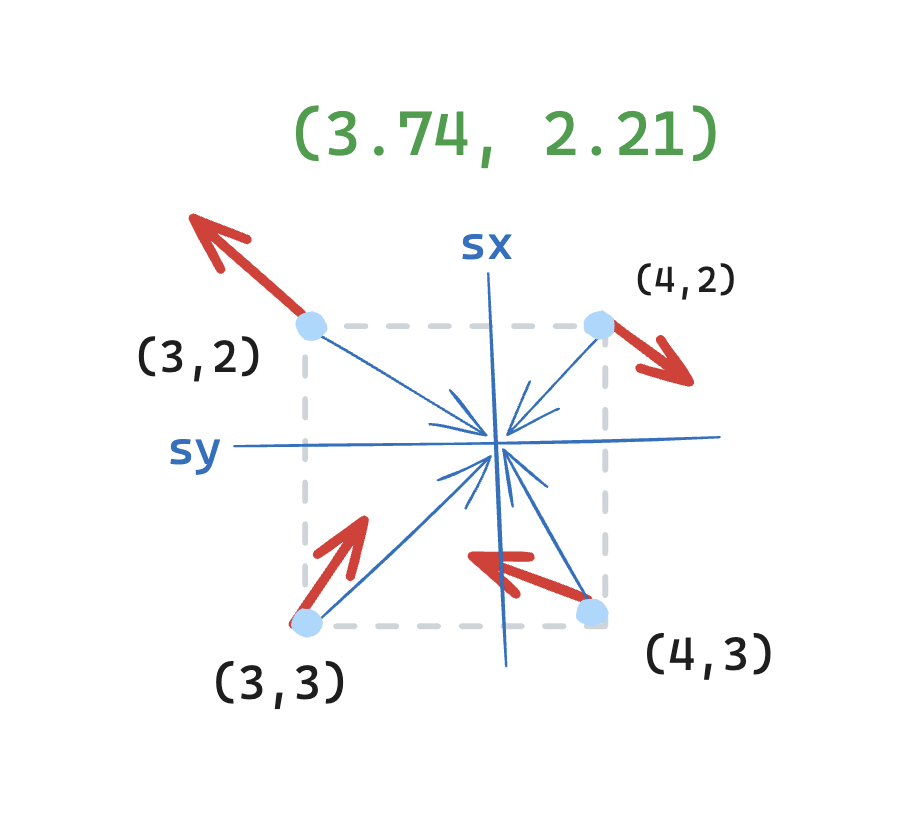
function dotProductGradient(coord: Coordinate, gradientCoord: Coordinate) {
	const gradient = getGradient(gradientCoord);

	// distance vector between the coordinate and the gradient origin position
	const dx = coord.x - gradientCoord.x;
	const dy = coord.y - gradientCoord.y;
	const dVector = { x: dx, y: dy };

	// dot product vector
	return dVector.x * gradient.x + dVector.y * gradient.y;
}

function getNoise(coord: Coordinate) {
	// ...

	// position of the coordinate relative in it's grid cell
	const sx = x - topLeftGradX;
	const sy = y - topLeftGradY;

	// top corners interpolation (x-axis)
	const dotTopLeft = dotProductGradient(coord, topLeftGradient);
	const dotTopRight = dotProductGradient(coord, topRightGradient);
	const topInterpolation = smoothInterpolate(dotTopLeft, dotTopRight, sx);

	// bottom corners interpolation (x-axis)
	const dotBottomLeft = dotProductGradient(coord, bottomLeftGradient);
	const dotBottomRight = dotProductGradient(coord, bottomRightGradient);
	const bottomInterpolation = smoothInterpolate(
		dotBottomLeft,
		dotBottomRight,
		sx
	);

	// combine those together (y-axis)
	const noise = smoothInterpolate(topInterpolation, bottomInterpolation, sy);

	// returns -1 ... 1
	return noise;
}
And that’s it. It actually quite simple, but the simplicity often obscured by the maths. From here you can play with the variables to get more interesting pattern. Some ideas to start is making pattern to the gradients generation, change the interpolation smoothness/smoothstep function, stacking multiple perlin noises with different variables, and so on. Hope it helpful!